Progress, Sort Of
Last week I mentioned that my daughter and I are painting her room. Progress is slow.
Right smack in the middle of her room is a chimney. It is not in the best location. In fact, it is definitely in the way. It is difficult to place furniture (beds) in the proper position due to the big fat chimney in the middle of the room.
This is an old photo.....

But, on the bright side, her room has character in spades. None of her friends have a chimney in the middle of their rooms, that's for sure!
After we painted the pink room a nice shade of pale gray, we started stenciling....

While we were stenciling, my daughter suggested exposing the brick on the chimney.
So we thought we would have a peak behind the sheet rock, just to see.

Just a small peak that could be repaired, of course.
All we found at first was plaster.
And then we dug a little deeper.

We hit paydirt.
Paydirt in the form of Georgia clay molded into bricks and mortar.
Once we realized that the sheet rock could not be easily repaired (as in - there was no turning back!), we made a compact with each other in blood (not really) to keep the chimney project a secret until it was complete. This meant we could not work on the project in the evenings when my husband was home. It would cause unnecessary stress on Mr. Status-Quo (new projects around the home that involve dust and debris and potential new problems are not his cup of tea.)
Thankfully, I ran across this blog: Brick City Love . She has a great tutorial on removing plaster and cleaning and sealing old brick. I was thrilled to find the wire brush attachment for my drill at Lowe's for less than $4.00.
It was a real pain to remove the sheetrock. (you can turn on the volume by hovering over this video and pressing the audio symbol in the upper left corner) then scroll further down the page to make it hush)
The sheetrock is the pink stuff in this photo....

and, oh, yes, we continued stenciling, because nothing is more soothing than working on two messy projects at once in a small enclosed area.

While texting and making Vines.
And then, just when we were making a TON of progress removing the sheet rock, we ran across this stupid hole....

Ugh.
By this point, I was saying "Your dad is going to kill me" about twice a minute. Honestly, there was a 6" diameter hole in the middle of the chimney on the side facing the door into her room. Can't miss it. We are guessing a stove used to sit here for warmth and the stove pipe vented to the chimney through this hole.
Just lovely.
Apparently, the squirrels know about this hole. But they must have forgotten where they left their pecans...

Here is my daughter's Vine regarding the hole (turn on the volume)...
On the plaster on one side of the chimney we found this inscription in pencil...

It reads "This was Rose and Benson's ______" We think maybe it said "room". I researched the previous owners and their children, but could not find anyone named "Rose" or "Benson" or possibly "Benton" in any of the families. I am guessing these were boarders who rented this upstairs room (and apparently stayed warm with a stove that vented to the chimney).
We also unearthed this lovely wallpaper...

It was on top of the plaster, so the hand-writing is older.
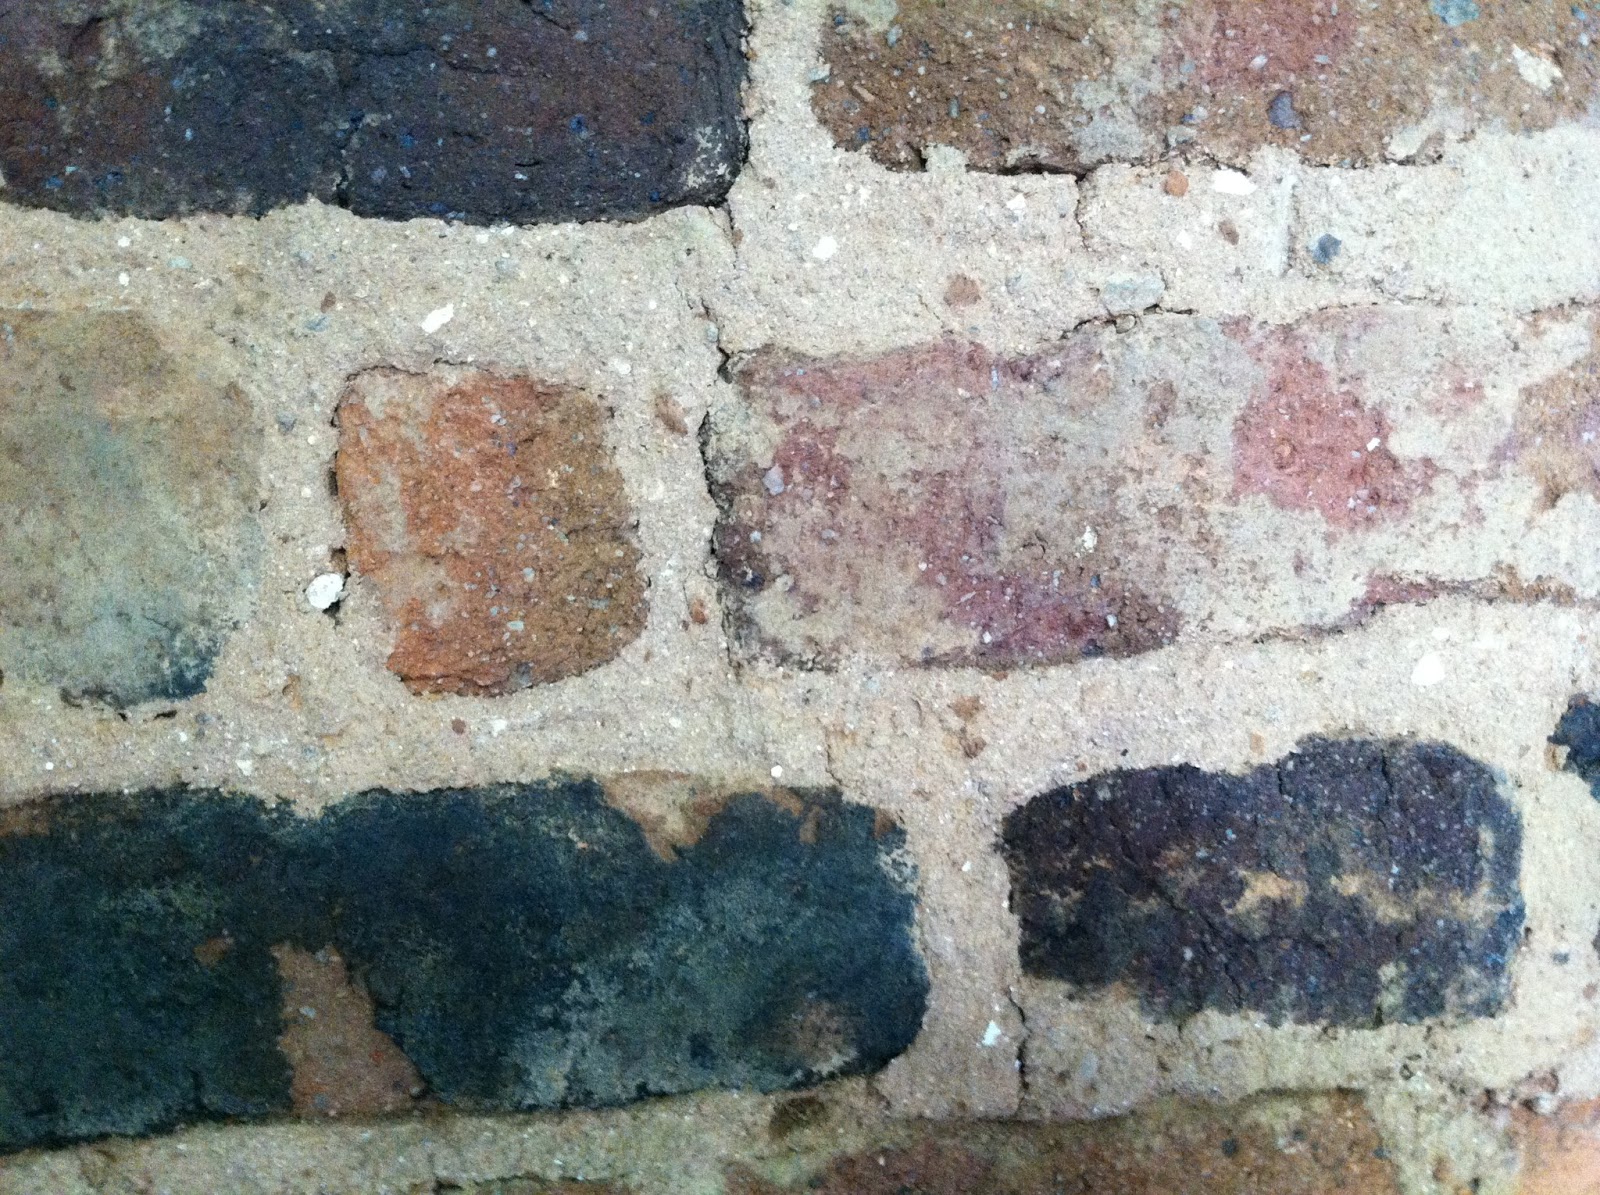
I personally think the brick is beautiful.
I personally think the brick is beautiful.

We decided to leave portions of the plaster for four reasons:
1) We like the look of the plaster/brick combination.
2)The gray plaster softens the starkness of a large brick chimney in the middle of the room, and will help tie the structure into the rest of the room.
3) the plaster is part of the history of the home.
And, most importantly,
4) the plaster provides support for the chimney - this is a really, really old fireplace and the bricks and mortar are quite brittle.
The bricks appear to be handmade and some actually become quite clay-like when wet (like I could have re-formed them, if I wet them enough!) I researched brick makers in this area in the 1800's and found that the area does not have much clay, therefore, there were no real brick 'factories.' Those people building with bricks would have had a kiln on site to fire their own bricks. Some of the bricks look quite charred.


We are trying to decide what to do about the hole. I bought a $2 sheet of acrylic plexiglass at Lowe's. It is 10"x12" and I thought I would cover the hole with that so that we can still see through the hole and into the chimney (with a flash light). Sort of like an exhibit in a museum where you can look into another area through a piece of almost-glass. I could charge the neighborhood kids to come and look into the little window and stare at the bricks on the back side of the chimney with a flashlight. The other option is to fill with broken pieces of old brick or stones and then mortar it closed. It currently has a wadded up t-shirt in it to keep the misquitoes, bats, etc. out of her room. I am open to suggestions regarding this hole.
I can't wait to show you the completed room. Come to think of it, I can't wait to finish the room. Maybe we can focus on the stenciling, now that the brick is exposed (unless, of course, we come up with another project within the project).
Have a great day!
sharing with Wow us Wednesday
Comments
Kat
-Trish
Thanks, Patty
Paula
ivyandelephants.blogspot.com